
So first I would just like to point out that this is not meant to be somekind of a tutorial or "LOL DO LIKE THIS AND UR GONNA BE PRO DUDE!"-post. This is just my way of doing things. It works great for me, might not work all that great for you. Just a heads up.
So! I always tend to start out with finding a nice shape a like. For this particular sprite, I know I want to create some bee-like insect dude. He's going to hang around in the first area of the game, so I don't want to make him to intimidating or scary.

So I basically just draw shapes until I find something a like. Sometimes a do a bit of research before I take this step, finding references and stuff like that. For this one I felt like I didn't need to cause I had a pretty clear picture in my head of what I wanted to go for.

When I've chosen one of the sketches (i chose to go with the middle one) I'll clean it up and refine the lines until I've got a clean outline to work with. When I'm doing pixelart, I go by the rule to try always keep the outline one pixel wide. You don't need to do this, it's just how I've been taught to do it.

After that, I just color block it to get a quick feel of the colors I'm going for. Nothing fancy.
Now, what I'm doing next is probably the most important step of my work process. I show my shit to the people I'm working with and ask for input. Do they like the shape, does it fit the enemy we're going for, what do I need to change etc.
So, I showed my sketch to Vilya, the other artist I'm working with. She said she liked the overall shape of it, but that she though it would be a tad too big. With the sprite now being almost as big as the Rabbi enemy, I totally agreed and reworked it.

Since we both liked the shape I tried to keep it as close to my first version as possible. When working with pixelart on such a small scale as this, keeping smooth shapes can be a bit tricky. It turns more into a puzzle of placing all the pixels perfectly then using your artistic skills.
But anyway! I show the new version to Vilya and she gives it thumbs up. Which leads us to the next step!

Coloring! I'm not gonna get to deep with this step, cause it's such a huge topic.
I try to keep such a low color count as possible. Mainly because within the pixelart community, you always strive to keep the amount of colors as low as possible, so this is something I've been taught to always go for. But also because I think it looks much more crisp and clean when you don't go balls out and add 200 shades of the same green.
Once again I show my shit to Vilya and we both agree that the colors are a bit dull and brownish.
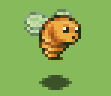
I do a few color changes in photoshop and ta-daa! The sprite is finished. Only thing left is a bunch of animations and this sucker will be good to go ingame!
And that's pretty much how I do it. Hope you guys enjoyed this mini walk through of mine. If it's something you guys want to see more of, you let me know! Might do something similar, but on how I tackle 2D animations. That's probably gonna end up as a video though. But yeah!
Now, I got some crappy movies and sleeping to attend to. See you later mother fuckers!
Inga kommentarer:
Skicka en kommentar